两只弯管,做自己的空气观测站
用Sensor.Community开源固件与SDS011+BME280套件,观察窗外PM2.5、PM10与温湿度变化。固定原官方推荐的KIT-2186免焊线束版,含8步图解、10项完整套件BOM和采购地址。约¥500–700,税运另计;装配约2–4小时,再记录24小时曲线。可自愿加入公共地图,非专业检测设备。
alan000

选择原项目清单中的Nettigo KIT-2186,先按10项BOM逐一核对。主控已预刷固件、BME280已焊接、线束插头防错;无需购买焊台或再焊针脚。照片展示旧版零件布局,只核对传感器与结构组成;新版线束以商品清单为准,不要混买KIT-2132的SHT31版本。
[Sensor.Community](http://Sensor.Community)[原教程](https://sensor.community/en/sensors/airrohr/) · [当前线束套件装配说明](https://docs.nettigo.pl/en/sensor-community/kit-2132-montaz) · [图文MIT许可](https://github.com/opendata-stuttgart/sensor.community/blob/develop/LICENSE)
图源:[Sensor.Community](http://Sensor.Community) and Community,Copyright (c) 2020,MIT;接线图署名roman-minyaylov。照片展示原版排针接线与弯管布局,当前KIT-2186改为专用线束,零件颜色和插头外观可能不同。中文整理与补充按MIT发布;非本站实测。
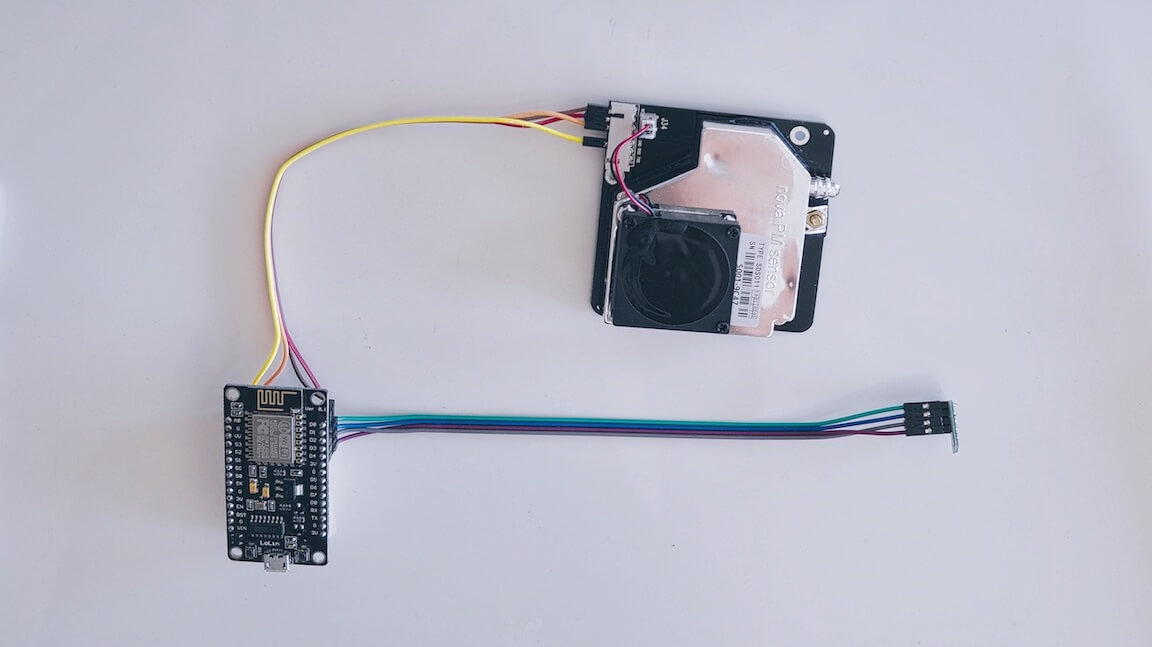

保持USB未接电。按套件专用线束的插头形状,将NodeMCU、SDS011和BME280连接起来;看清插座再轻插到底,不硬压、不偏插。当前线束已经定义电源和信号,不另外用杜邦线改接。若手上是普通散件排针版,本页线束路线不适用,应单独按原版接线图和对应BOM制作。
[Sensor.Community](http://Sensor.Community)[原教程](https://sensor.community/en/sensors/airrohr/) · [当前线束套件装配说明](https://docs.nettigo.pl/en/sensor-community/kit-2132-montaz) · [图文MIT许可](https://github.com/opendata-stuttgart/sensor.community/blob/develop/LICENSE)
图源:[Sensor.Community](http://Sensor.Community) and Community,Copyright (c) 2020,MIT;接线图署名roman-minyaylov。照片展示原版排针接线与弯管布局,当前KIT-2186改为专用线束,零件颜色和插头外观可能不同。中文整理与补充按MIT发布;非本站实测。
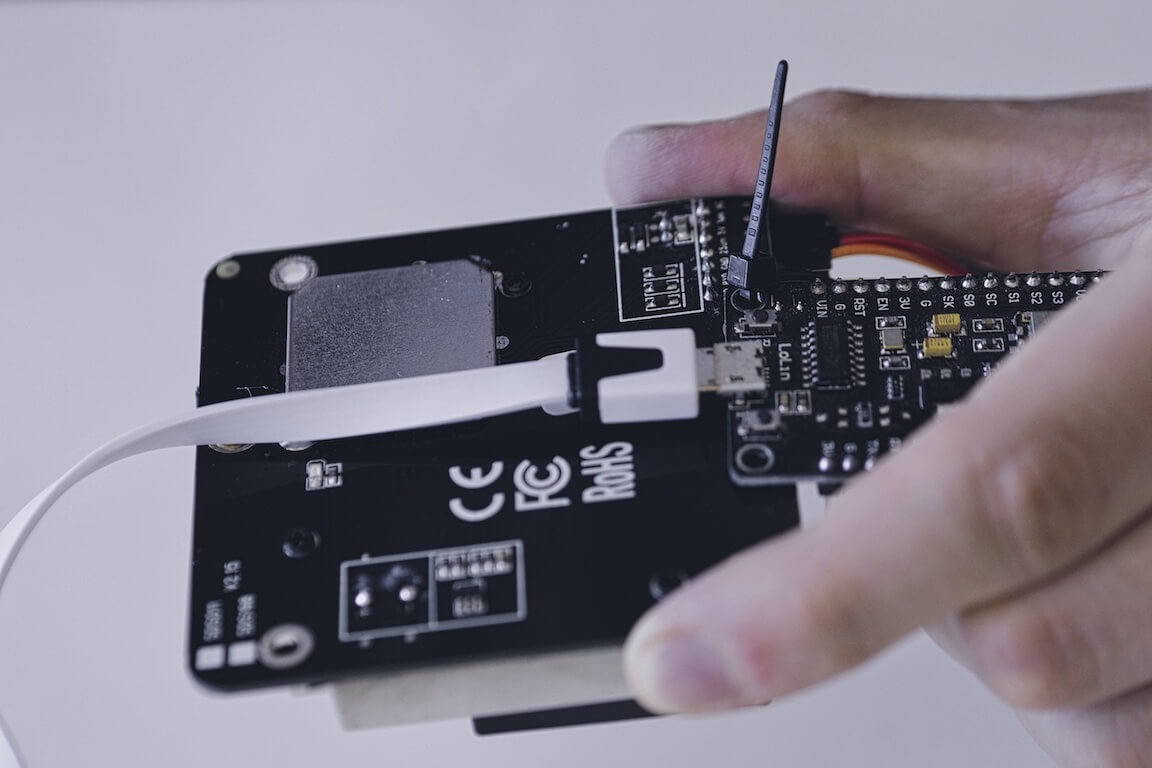

用一条100mm短扎带把NodeMCU与SDS011固定,Wi-Fi天线朝远离金属传感器的一侧,不压住风扇和插头。把6mm内径软管套在SDS011进气嘴,避免弯折堵住。连接Micro-USB线,先不接电源。
[Sensor.Community](http://Sensor.Community)[原教程](https://sensor.community/en/sensors/airrohr/) · [当前线束套件装配说明](https://docs.nettigo.pl/en/sensor-community/kit-2132-montaz) · [图文MIT许可](https://github.com/opendata-stuttgart/sensor.community/blob/develop/LICENSE)
图源:[Sensor.Community](http://Sensor.Community) and Community,Copyright (c) 2020,MIT;接线图署名roman-minyaylov。照片展示原版排针接线与弯管布局,当前KIT-2186改为专用线束,零件颜色和插头外观可能不同。中文整理与补充按MIT发布;非本站实测。
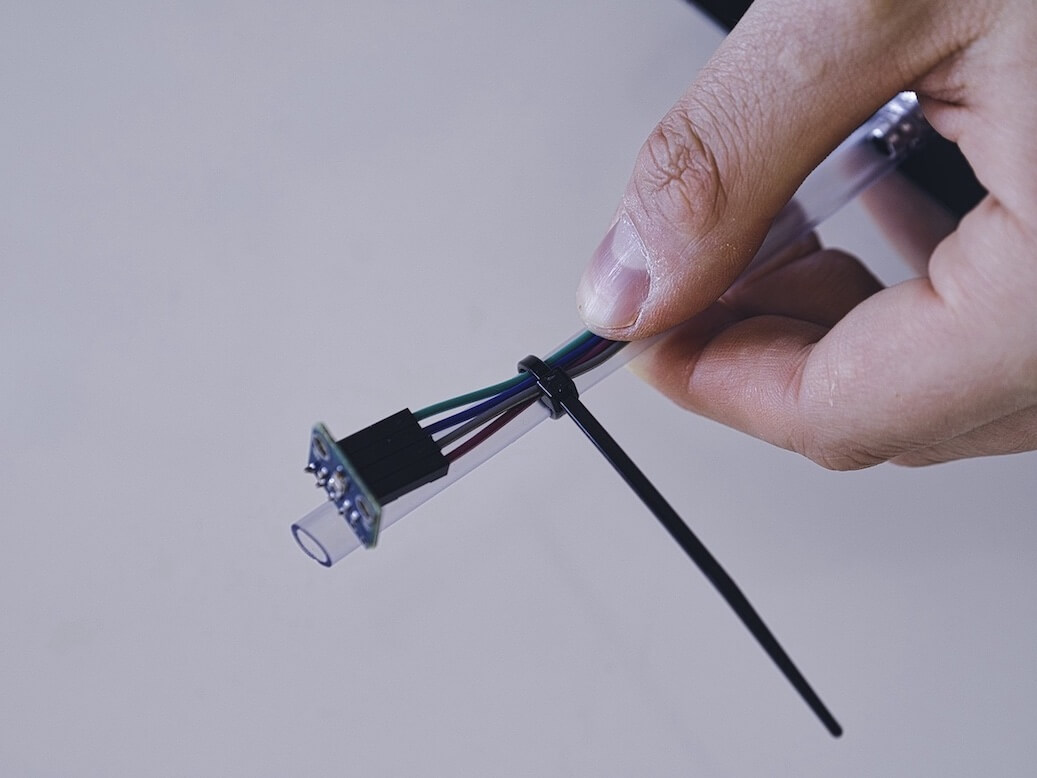

用第二条短扎带整理进气软管、USB线与BME280线束。BME280放在通风的弯管开口附近,远离主控热源,并避免直接淋雨。不要把传感器孔封胶或扎带压在元件上。照片仅示意位置,新版板与连接器形状不同。
[Sensor.Community](http://Sensor.Community)[原教程](https://sensor.community/en/sensors/airrohr/) · [当前线束套件装配说明](https://docs.nettigo.pl/en/sensor-community/kit-2132-montaz) · [图文MIT许可](https://github.com/opendata-stuttgart/sensor.community/blob/develop/LICENSE)
图源:[Sensor.Community](http://Sensor.Community) and Community,Copyright (c) 2020,MIT;接线图署名roman-minyaylov。照片展示原版排针接线与弯管布局,当前KIT-2186改为专用线束,零件颜色和插头外观可能不同。中文整理与补充按MIT发布;非本站实测。
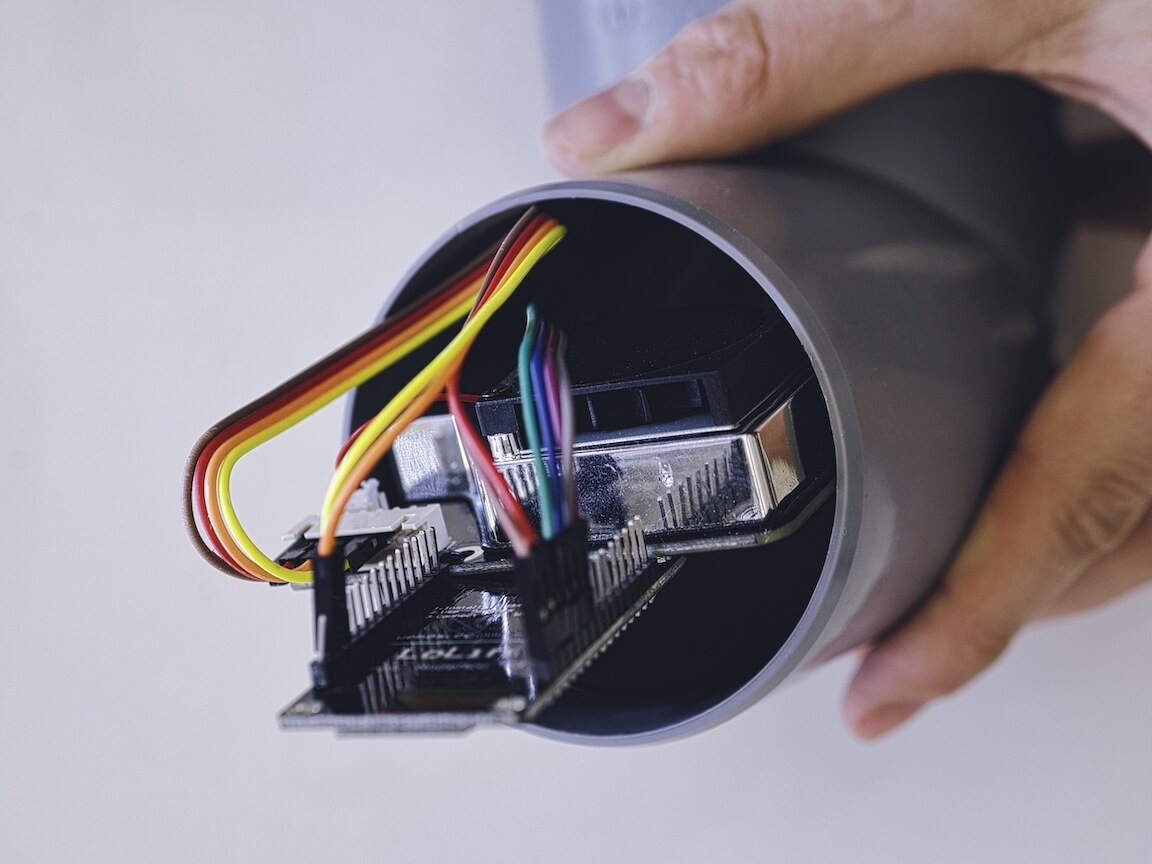

USB线从弯管出口穿出,将组件轻放入第一只DN75弯管,SDS011风扇朝下。接上第二只弯管并压合密封圈,不夹住线束。软管按开口位置裁到合适长度,保持入口畅通;BME280停在通风口边缘。双弯管是防雨遮挡,不是可浸水密封盒。
[Sensor.Community](http://Sensor.Community)[原教程](https://sensor.community/en/sensors/airrohr/) · [当前线束套件装配说明](https://docs.nettigo.pl/en/sensor-community/kit-2132-montaz) · [图文MIT许可](https://github.com/opendata-stuttgart/sensor.community/blob/develop/LICENSE)
图源:[Sensor.Community](http://Sensor.Community) and Community,Copyright (c) 2020,MIT;接线图署名roman-minyaylov。照片展示原版排针接线与弯管布局,当前KIT-2186改为专用线束,零件颜色和插头外观可能不同。中文整理与补充按MIT发布;非本站实测。

给USB电源接电,等待设备建立airRohr-数字ID热点(也可能是Feinstaubsensor等旧名称)。记下数字ChipID;手机连热点,密码airrohrcfg,浏览器打开<http://192.168.4.1。在配置页选择自家2.4GHz> Wi-Fi,核对SDS011与BME280被启用,保存并重启。连上家庭网络后热点通常消失,从路由器设备表寻找它的新地址。
[Sensor.Community](http://Sensor.Community)[原教程](https://sensor.community/en/sensors/airrohr/) · [当前线束套件装配说明](https://docs.nettigo.pl/en/sensor-community/kit-2132-montaz) · [图文MIT许可](https://github.com/opendata-stuttgart/sensor.community/blob/develop/LICENSE)
图源:[Sensor.Community](http://Sensor.Community) and Community,Copyright (c) 2020,MIT;接线图署名roman-minyaylov。照片展示原版排针接线与弯管布局,当前KIT-2186改为专用线束,零件颜色和插头外观可能不同。中文整理与补充按MIT发布;非本站实测。

先打开设备本地页面,确认PM2.5、PM10与BME280温湿度气压有数值,连续观察至少三次更新,记录版本和时间。加入公共地图时,[在devices.sensor.community](http://在devices.sensor.community)注册自己的账户,登记ChipID、正确传感器型号与放置环境;根据页面说明决定位置公开精度。不要把用户名密码写进复现文档。联网上传配置正确后,可按ChipID到Madavi查询曲线;地图出现可能延迟。
[Sensor.Community](http://Sensor.Community)[原教程](https://sensor.community/en/sensors/airrohr/) · [当前线束套件装配说明](https://docs.nettigo.pl/en/sensor-community/kit-2132-montaz) · [图文MIT许可](https://github.com/opendata-stuttgart/sensor.community/blob/develop/LICENSE)
图源:[Sensor.Community](http://Sensor.Community) and Community,Copyright (c) 2020,MIT;接线图署名roman-minyaylov。照片展示原版排针接线与弯管布局,当前KIT-2186改为专用线束,零件颜色和插头外观可能不同。中文整理与补充按MIT发布;非本站实测。

在低处可安全操作的通风点,用两条长扎带牢固固定弯管,管口避开迎雨方向;市电适配器留在室内,外部USB线留滴水弯,不能被窗夹伤。记录离地高度与附近道路、排风口情况。收集至少24小时连续数据和安装照片;潮湿、雾和布点都会影响光学颗粒物读数,适合观察趋势,不作为医疗判断或监管级检测。
[Sensor.Community](http://Sensor.Community)[原教程](https://sensor.community/en/sensors/airrohr/) · [当前线束套件装配说明](https://docs.nettigo.pl/en/sensor-community/kit-2132-montaz) · [图文MIT许可](https://github.com/opendata-stuttgart/sensor.community/blob/develop/LICENSE)
图源:[Sensor.Community](http://Sensor.Community) and Community,Copyright (c) 2020,MIT;接线图署名roman-minyaylov。照片展示原版排针接线与弯管布局,当前KIT-2186改为专用线束,零件颜色和插头外观可能不同。中文整理与补充按MIT发布;非本站实测。